Wednesday, April 30, 2014

Love My Tapes


If you know me, you know I love my tapes as much as the next girl (or more!). I have a very hard time not adding tape to a project. Luckily, there are many projects in my future with tapes as the focus. I'm excited to share that I have been asked to join the Love My Tapes team through August!


Not only is there a new design team, but Love My Tapes is also getting ready to launch a new website in May. To be in the know, be sure to follow Love My Tapes at all the usual social media sites:

Facebook: https://www.facebook.com/LoveMyTapes 
Blog: http://www.lovemytapes.blogspot.com/
Pinterest: http://www.pinterest.com/lovemytapes/
Instagram: http://instagram.com/lovemytapes#

Thanks to Love My Tapes for the opportunity! And thank you for stopping by! Tessa

Sunday, April 27, 2014

Smash Sunday - Hi There


Hello! I started a new SMASH book this past week - the light blue, retro portfolio. This one features bright colors, fun designs, and quirky images and phrases. I decided to get started on this book when I opened up the May kit from Scrapbook Circle, High Five. I absolutely love this kit (and the two add-ons that are also available)! It's filled with Basic Grey's Highline collection, new Heidi Swapp, Amy Tangerine, Pink Paislee and other bright papers and embellishments. It was fun to work with bright pink and orange, yellow and green:


Everything you see except for the thread, mist and washi tape is from the main kit or add-ons. The left side barely had any pink on it, so to pull that color across, I used the mask from the kit and some Color Shine. I filled a few of the circles with patterned paper (my 1 inch circle punch came in handy!).


The "Hi there" tag is an exclusive design from Scrapbook Circle, available only in the kit. I embellished the sweetness tag with thread and a puffy heart by Heidi Swapp. The camera sticker is Amy Tangerine (and super cute!). The date stamp is also an exclusive design by Scrapbook Circle for the kit. I want to make more of an effort to date my pages with the dates that I create them. I think this stamp will help!


The right side is more about stickers and paper. The patterned paper is from the Highline 6x6 paper pad. The speech bubble stickers, corner sticker and flower sticker are also Highline. The gold glittered polaroid frame is by Heidi Swapp.


The "you + me" is another exclusive stamp. I love the stamps that come with these kits - awesome quality and the kind of designs and phrases you can use again and again. I also traced inside the pre-printed "like this" words.


If you'd like to get your hands on this kit and the add-ons, I have a coupon code for you! If you are new to Scrapbook Circle, use code tessa20off to get 20% off of your first order. If you are a current subscriber, use the code to get 20% off of add-ons and extras in the shop. You will LOVE the add-ons for May, so hurry and pick them up! Find Scrapbook Circle here, the main kit here, an add-on here, and the other add-on here.

Thanks for stopping by today! I feel more bright SMASH pages coming on :). Have a good one! Tessa

Friday, April 25, 2014

Front Door Friday - Mint, Kelly Green Pink and Gold


I've been inspired by my Color Palettes Pinterest board once again! I fell in love with this pin, which led me to the others you see in my inspiration board.

one - two - three - four - five

With these images in hand, I went to the craft store and shopped for yarn, flowers, and trim. The result:


I think it is perfect for Spring. It makes me think of the pink roses growing in my yard, the green grass, and the fresh scent in the air. I used four yarns - two fairly standard yarns (pink and mint), a soft, fluffy yarn (kelly green) and a gold yarn by Martha Stewart that reminds me of fettuccine noodles. I love it, and love it even more because I got it on clearance for a steal :).


The gold yarn was not quite enough "bling" for this wreath, so I added some gold trim.


The flower embellishments on this wreath are a mix of store-bought and handmade. The large pink flowers are by Jolee's, found at both Michaels and JoAnn. The felt roses are handmade.


Thanks for stopping by today! I hope you are enjoying my wreath series and will join me again next Friday. Have a good one! Tessa

Thursday, April 24, 2014

True North - Scrapbook Circle

What do you get when you combine 1 large photo, 3 patterned papers, a dash of die-cuts and a pinch of wood veneers? The current challenge at Scrapbook Circle, of course! Yes, we are hosting an old-school recipe challenge and this is my take:


Over Spring Break, usually the first day, we take a traditional family day trip to Sacramento. We always visit Old Town and the State Railroad Museum, and then sometimes we also do the Sacramento Zoo or Fairytale Town. This year, because Carson is studying California history in school, we decided to visit Sutter's Fort. Sutter's Fort is located right in the heart of downtown Sacramento. Surrounded by modern buildings, it seems totally out of place. The grounds are beautiful, though, with water, ducks, flowers and dirt paths. You walk inside and it's like you've gone back in time. The exhibits were really informative and the boys had fun exploring. It isn't very big, so it only took a little over an hour, but we picnicked for lunch outside and had a good time before heading to Old Town.


I used this shot of the boys at the entrance for my 1 large photo. I printed it as an 8x10, but you don't have to use a photo that large if you don't want to. To me, large is anything bigger than the 3x3 instagram shots I typically print. I took advantage of the white space in the wall of the fort to design my page. I chose this diagonal blue stripe as one of my three patterned papers because my son is wearing a similar shirt in the photo. I love it when papers match clothes so easily!


I glued my "pinch of wood veneer" triangles in a meandering line across my photo. I thought the path with the triangles leading north was a good way to emphasize my theme. And the die-cut compasses and other travel die-cuts were my "dash of die-cuts".

You can read more about my page at the Scrapbook Circle blog today. You can find all the details for playing along at Scrapbook Circle here. You have two weeks left to play along, and there's a fabulous Oh Darling by Crate Paper prize package up for grabs. You don't have to be a subscriber to play, so I hope to see you join in! Thanks for stopping by :). Tessa

Tuesday, April 22, 2014

Chore Charts - DCWV Brooklyn Stack

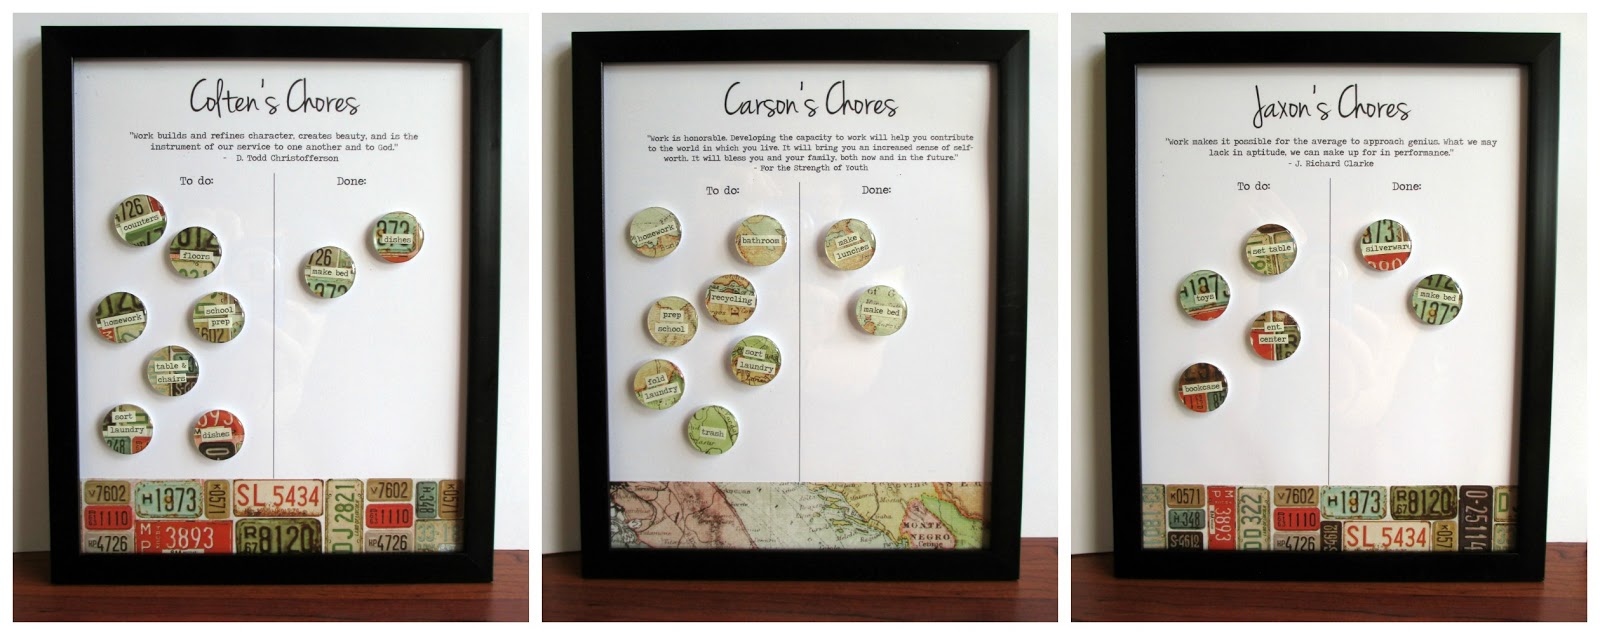
About a year and a half ago, I created chore charts for my boys. You can read my tutorial for making them here, but basically they are a framed piece of paper backed with a thin sheet of metal. The circles are patterned paper covered with epoxy stickers, and secured to the boards with neodymium magnets. The two oldest boys rotate their chores each week, which is easy to do by switching the magnets. This system has worked really, really well for us.The boys still love to move their magnets from the "to do" column to the "done" column. However, our schedule has evolved, the boys' skills have evolved, and the poor chore charts took a beating with all that daily use. So, please welcome the Buys' family chore charts, version 2.0:


These are the changes we made to our system:
1. We re-evaluated what needed to be done during the week and what needed to be done on Saturdays. To compensate for changing family schedules, we made the weekday chores a bit easier and the Saturday chores a bit more involved.
2. Some "chores" were just expected behavior before, such as getting ready for school the next day by preparing clothes, brushing teeth/showering, packing backpacks, etc. Those things were slipping through the cracks many nights, so it became a magnet on the chart. Having that visual reminder has helped.
3. We gave the little guy more chores. Can you believe he turns five this week?


4. We put more emphasis on cleaning up after yourself, taking responsibility for your own actions. For example, we eliminated the bedroom as a chore. Instead, each boy is to pick up after himself. This eliminates the "he left a huge mess for me to clean" dilemma and reinforces personal responsibility.
5. Saturday chores are now paid chores. Weekday chores are not paid. If a weekday or Saturday chore is left undone, the boy must pay Mom or Dad to do it for him. This is helping the boys to learn that when they choose not to do their work, someone else has to make up for it. Making the boy pay for it hurts just enough to make him think twice about slacking.


6. Saturday chores are chosen from a list, not assigned. This gives the boys the chance to do "favorite" tasks instead of assigned tasks like during the week. However, we reserve the right to request a job be done by a certain boy if he needs to build certain skills or learn a certain responsibility.

These are the changes I made to the charts:
1. I used a new font at the top (Jenna Sue).


2. I added a quotation about work to each chart. Colten saw this and said, "Mom, I like the quotes. They remind me what I'm doing this for." Yay for 11 year olds who "get it"! Well, most of the time ;).


3. I added a strip of patterned paper to the bottom for more pattern and color.


4. I re-made the chore magnets with the same patterned paper.


And what is that super cute paper, you ask? It's by DCWV, from the Brooklyn Stack. The Brooklyn Stack is filled with fantastic textures and images. Think city, travel, hipster. It is a great stack for masculine projects and many of the pages have a glossy, embossed texture. I can't wait to put more of the patterns to use on other projects for my boys.


If you need more information, How the Buys' Do Chores is my first post about our chore system and the tutorial for making these charts. If you give this system a go, I'd love to hear about what works for you and what doesn't. Thanks for stopping by! Tessa

Monday, April 21, 2014

Onesie Love - Scrapbook Circle and Top Dog Dies Blog Hop

Hello and welcome to my stop on the Scrapbook Circle/Top Dog Dies Blog Hop! If you've just happened upon this post and would like to hop along, please start here. Otherwise, if you just came from Diana Waite's blog, you're in the right place.


As you know, we are showcasing Top Dog Dies in action with Scrapbook Circle's April Kit, Bucket List. I'm happy to be a part of the creative team at Scrapbook Circle for my fourth year and currently am a blog coordinator (along with the lovely Diana Fisher). I set the challenges and bring you special features about my favorite items from the kits each week. I was a fan of Scrapbook Circle before I ever designed for the company and can honestly say I'm an even bigger fan now. I'm also a new fan of Top Dog Dies after using the darling baby set to create a layout and two cards:


My baby girl was born 12 weeks ago and has outgrown her 0-3 month clothing. It's sad to pack away these adorable onesies, leggings and sleepers, but at the same time, I'm excited to shop for more clothes!


This layout is about the growing stack of outgrown onesies in her nursery. The newborn stage just isn't long enough.


The dies were so simple to use. I use my Sizzix machines a lot, so I had all the cutting plates and platforms I needed on hand. To create the onesie for this layout, I cut just half of the A2 onesie card out of white cardstock. Next, I used this Fancy Pants Designs paper from the Bucket List kit to create a chevron bib. I pleated tissue paper to make ruffles, then layered the chevron piece on top.


I sewed a few buttons from the kit onto the bib with bright pink thread. Last, I added the die-cut collar and scalloped edging at the legs. I wish I could turn this paper onesie into a real, live fabric one!


I also wanted to put the card die to use as it was intended, so I made two similar cards for friends who just had baby girls. I followed the same design and used more buttons from my stash. Just a tip, though. If you're going to use big heavy buttons, be sure to use super-sturdy cardstock or else your card is going to be top heavy. Yep, lesson learned ;).


Thanks to Top Dog Dies for the opportunity to work with the baby set! It's absolutely adorable and I can't wait to work on more baby projects.

In celebration of this fun hop, both companies have special promotions. Scrapbook Circle is offering a 20% discount on your order through May 31st. Use code scrapbook20 for that deal. Top Dog Dies is offering a 15% discount on orders of $100 or more (code schop15); 10% discount on orders of $60 or more (schop10).

If you aren't shopping, you could still walk away with a kit from Scrapbook Circle or $50.00 worth of dies from Top Dog Dies just for hopping and commenting along! So get to it - your next stop is the talented Leslie Ashe. Thanks for visiting and have a great day!

Tuesday, April 15, 2014

Spring Celebration Countdown Chalkboard - SRM Stickers

The current challenge at the SRM Stickers challenge blog is to create a project that celebrates something. In the month of April, between Spring Break, Easter, and two boys' birthdays, we are constantly counting down to one celebration or another. So, I decided to make a simple countdown to add to our Spring/Easter decor:


I found this cute chalkboard on an easel in the dollar bins at Michaels. There were other colors, too, but I loved the green.


I added an SRM stitches sticker to the bottom, then the "hello sunshine" sticker. I love how SRM's white stickers pop on colored backgrounds :).

I added several paper flowers to the edge (Prima, with bling by DCWV) and a cute bow at the top to match one of my flower pots. I leave a piece of chalk next to the chalkboard and every day we erase the previous number and write in the new one. After Easter, we'll switch to a countdown to Jaxon's birthday, then to Carson's.


Thanks to SRM Stickers for the inspiration! We all love our new Spring Celebration Countdown Calendar :).

Sunday, April 13, 2014

Smash Sunday - Enjoying...


Hello! I've got two more page spreads from my SMASH words book for you today. Two totally different color palettes - one more muted, one super bright. I love that about SMASH books. Unlike mini albums, I feel no need to color coordinate all the pages together. First up, this one about my family:


The left side is a collection of numbers, random die-cuts that I had in my stash that represent different numbers in my life. The page calls for a top 10 list, but I wasn't feeling it, so a collage of numbers was born. I also used a vintage playing card and bike flair from a past Studio Calico kit.


The right side is a photo of my middle son and me. The word tiles are old GCD Studios product (I'm hoarding these as I can't bear to run out). I also used a Maggie Holmes bow and Jenni Bowlin bingo card.


More detail shots of these pages can be found here in my Flickr gallery. Next up, a much brighter page spread about summer:


Yes, I actually made these pages last summer. I was just too sick to photograph, edit and post these then. I went with a bright yellow, pink and green color scheme because those colors say summer to me. I wanted to make this set of pages more about journaling, so I used lots of journaling tags.


I also used another vintage playing card and flair from A Flair for Buttons :).


The right side features a paint chip and the front of a pamphlet about shades of yellow that I picked up from a hardware store. The rose picture is a photo that I took that summer of roses in my front yard. The yo-yo is a mini yo-yo from my Etsy shop. Love those! Wish I could add more without bulking up my book.


Again, more details can be seen in my Flickr stream. Thanks to all of you who commented here, on Facebook, on instagram and on Pinterest about the return of Smash Sunday. I'm excited to be back and your enthusiasm makes me happy :). Thanks for stopping by today! Have a great start to your week! Tessa

Friday, April 11, 2014

Adlyn's Nursery Wreath - Front Door Friday


Welcome to installment #2 of Front Door Friday! Someone asked me, "Are you really going to share a new wreath every week?" My answer is yes, that's the plan for now! Last week's post was about the Spring wreath currently on my front door. Today's post is about the wreath I made for Adlyn's nursery's door:


I love how feminine lace instantly makes any project. The teal color is fun and bold and the scalloped edge is a beautiful pattern to repeat around the wreath.


Because the wreath is an indoor wreath, I was able to raid my stash of paper flowers as embellishments. All of these flowers are by Prima. I don't recommend using paper flowers on wreaths that will be outdoors. The sun will fade them quickly and moisture will damage them. Plus, bugs like to make them homes and it's hard to clean them out.


I only had one of these doilies but I wanted a bit to peek out at the top and bottom of the cluster of flowers. So, I cut it in half. This tip works great for paper doilies on scrapbook pages, too. ;) I thought about hanging this wreath by more of the lace, but this key print twill ribbon was perfect for a door. Key...door...get it?


I'm not sure I'll make an inspiration board every week, but last week's was popular so I gave it a go this time around, too:

Thanks for visiting! Next week I'll be sharing another Spring wreath, this time full of pastels perfect for Easter. Have a great day!